Purpose of the Analysis
This page compares Norman’s Action Cycle, the GOMS model, and KLM (Keystroke-Level Model) using practical examples to highlight differences in cognitive processing, task execution, and feedback. All examples are based on Dix et al., Human–Computer Interaction, Chapters 9 and 12.
Example 1: Enabling Wi-Fi on a Smartphone

| Stage | User Action | GOMS / KLM Interpretation | Analysis |
|---|---|---|---|
| Goal | User intends to turn Wi-Fi ON to access the internet | Goal = Enable Wi-Fi | ✅ Both models agree on objective; Norman frames cognitively, GOMS structurally |
| Plan / Decision | User chooses Quick Settings / Control Center instead of full Settings | Method = Swipe down → Tap Wi-Fi toggle; optional selection rules if multiple methods exist | 🟡 Norman emphasizes mental decision; GOMS focuses on method selection |
| Target Identification | User visually locates Wi-Fi icon among toggles | Not explicitly modeled; may correspond to KLM [M] | ⚠️ Norman models perception; GOMS assumes target already known |
| Execute | User taps the Wi-Fi toggle | Operator = Tap; KLM sequence: M → P → K | ✅ Both models capture physical action; timing measurable in KLM |
| Feedback / Evaluate | User sees icon color change and confirms connection | Feedback assumed, not modeled | ❌ Norman addresses Gulf of Evaluation; GOMS ignores perception |
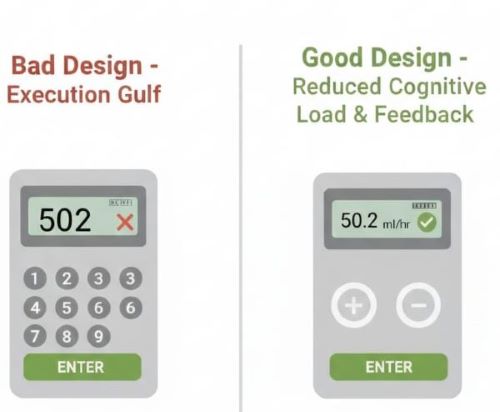
Example 2: Automatic Syringe Dose Calculator
| Stage | User Action / Interaction | Design Interpretation | Analysis |
|---|---|---|---|
| Goal | User wants to enter dosage quickly and safely |
Bad: Enter dosage without guidance Good: Clear, step-by-step input layout |
✅ Good design gives clear objective; bad design increases cognitive load |
| Plan / Decision | User decides how to input dosage |
Bad: Confusing keypad layout Good: Logical numeric layout, easy to plan input |
🟡 Good design reduces mental effort; bad design requires more cognitive processing |
| Target Identification | User locates number keys on syringe keypad |
Bad: Keys hard to differentiate Good: Keys visually distinct and clearly labeled |
⚠️ Good design improves perception; bad design increases error likelihood |
| Execute | User presses keys to enter dosage |
Bad: Input errors frequent Good: Accurate and efficient input |
✅ Execution smoother in good design; bad design leads to mistakes |
| Feedback / Evaluate | User verifies dosage and confirms |
Bad: Unclear or delayed feedback Good: Immediate confirmation of dosage entered |
❌ Strong feedback closes evaluation gulf; weak feedback increases error risk |
Example 3: Using a Water Dispenser (Button-Based)

| Stage | User Action | GOMS / KLM Interpretation | Analysis |
|---|---|---|---|
| Goal | User wants to fill a cup with water | Goal = Get water | ✅ Both models clearly define the objective |
| Plan / Decision | User decides to press the dispenser button | Method = Hold cup → Press button | 🟡 Norman highlights intention; GOMS defines task method |
| Target Identification | User visually locates the water button | Not explicitly modeled; assumed known | ⚠️ Norman models perception; GOMS assumes button is visible |
| Execute | User presses and holds the button | Operator = Press; KLM: M → P → K | ✅ Physical action captured well by both models |
| Feedback / Evaluate | User sees water flowing and releases button when cup is full | Feedback assumed, not detailed | ❌ Norman explains feedback; GOMS ignores evaluation |